Ubiquiti Unifi Controller on Synology with Let’s Encrypt
If you have Ubiquiti Unifi network equipment you also need the Unifi Controller. If you have a Synology NAS already available in your house there is no need to buy the Unifi Cloud Key Gen2. Since it is best to keep the controller running 24/7. We then use a Docker Image to run the Unifi Controller and also assign a valid Let’s Encrypt certificate to it. In this article, I will guide you through the installation for Synology NAS.
Firewall
If you run Synology firewall you will need to create to following 2 rules:
TCP rule:
- Create to add a Firewall Rule – select under Ports > Custom
- TCP – Ports: 8080,8443,8843,8880,6789
UDP rule:
- Create to add a Firewall Rule – select under Ports > Custom
- UDP – Ports: 3478,10001
Before we can start we need to make sure that your Synology supports Docker. Login to your Synology and go to the Package Center, search in the top left corner for Docker. If it doesn’t return any results, then Docker isn’t supported for your model.
Installing Docker and Java8 on your Synology
First, we are going to install Docker. Docker allows you to run applications in containers. This way other application on the same machine won’t be harmed.
Second, we are going to install Java8. It contains the important keytool command. This command is needed to convert the Let’s Encrypt certificate later on from .pem to keystore
Reboot the NAS after installing JAVA in order to get keytool working.
Installing the Unifi Controller
Downloading the image
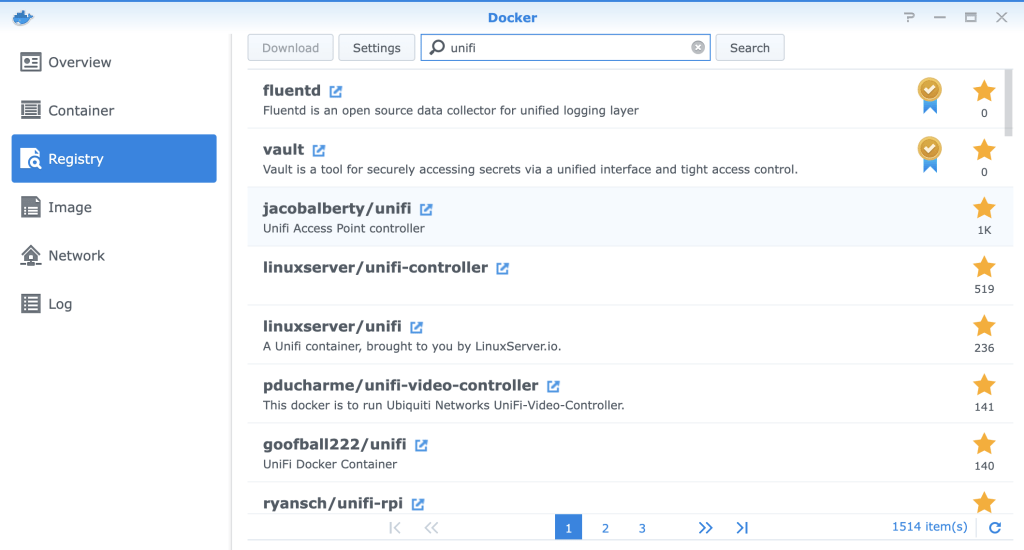
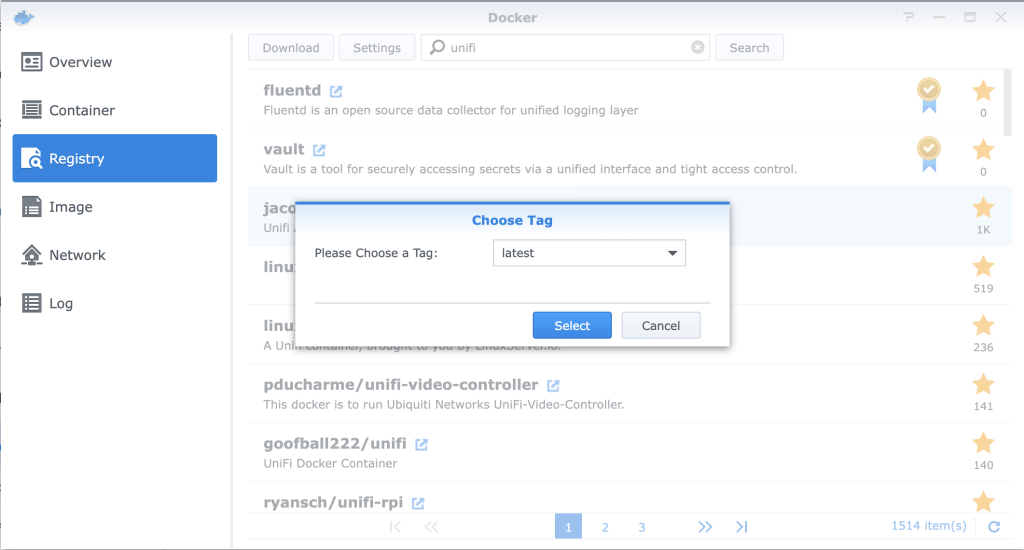
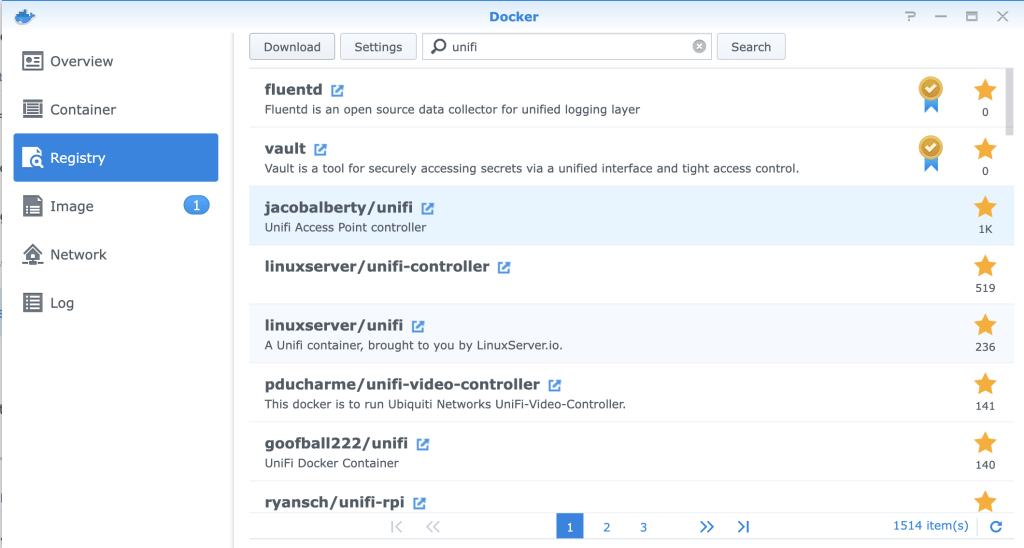
After Docker is installed you click on Open. Then click on Registry on the left hand side in the Docker App. Type in the search field “unifi” and click Search. Look for jacobalberty/unifi and double click it. This will then ask you what tag you would like to download. Leave at latest and click select. It will then download the image.
Starting the image
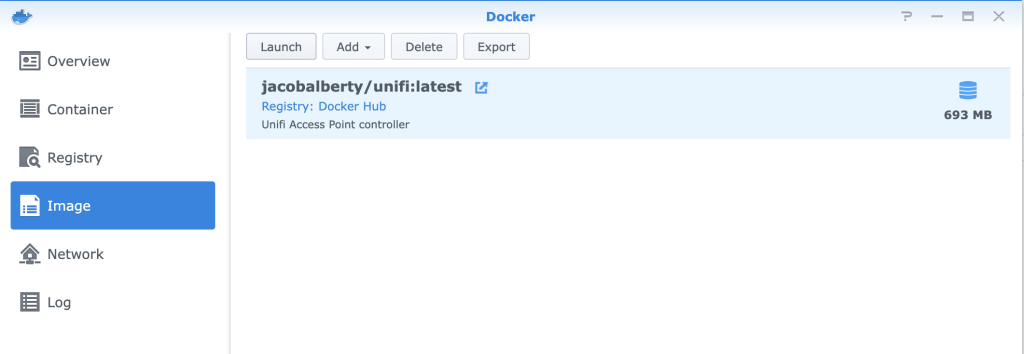
Go to the Image tab on the left side. Select jacobalberty/unifi. It may take a few minutes to download the image, you can see the progress on the right hand side. When the download is complete, select the image and click on Launch
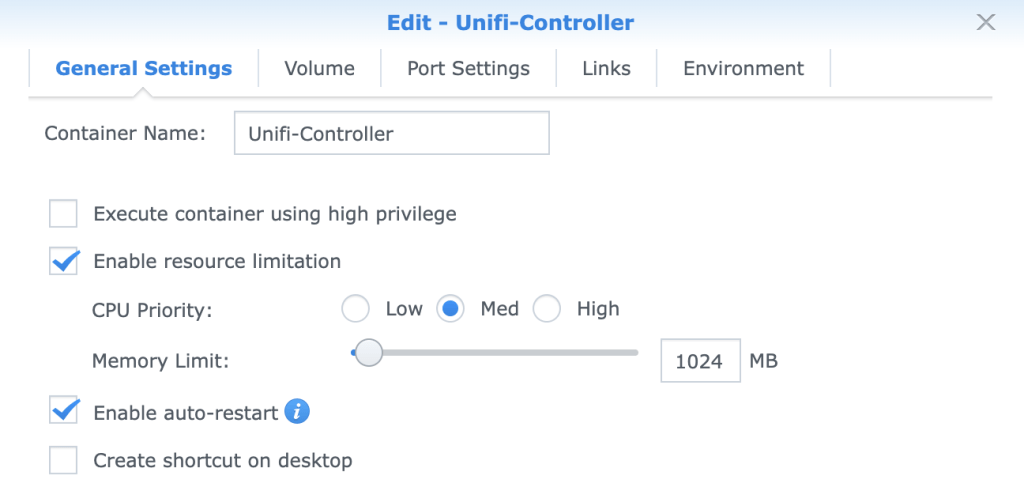
After you clicked on Launch, the container configuration wizard will start. We need to change some settings.
- Give the Container a name. i use: Unifi-Controller.
- Enable resource limitation, this way the Unifi Controller can not use all the resources of your Synology.
- Click on Advanced Settings
- Enable auto-restart, when you restart your Synology the container will launch as well.
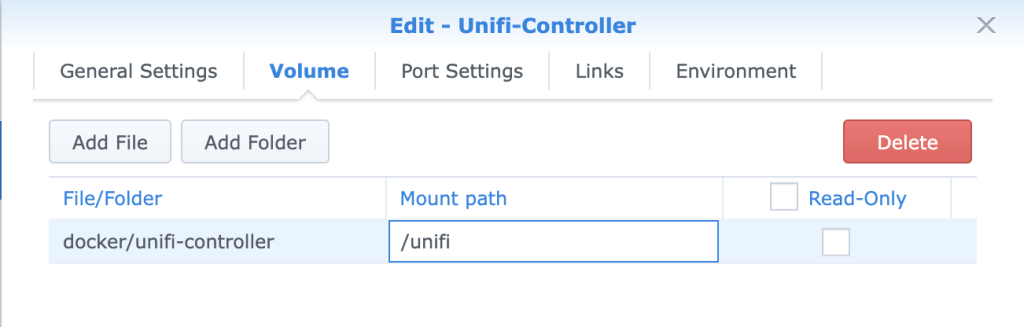
- Click on Volume tab
- Click on Add Folder, select docker and click create folder name it “unifi-controller” and press select
- point to mount path: /unify
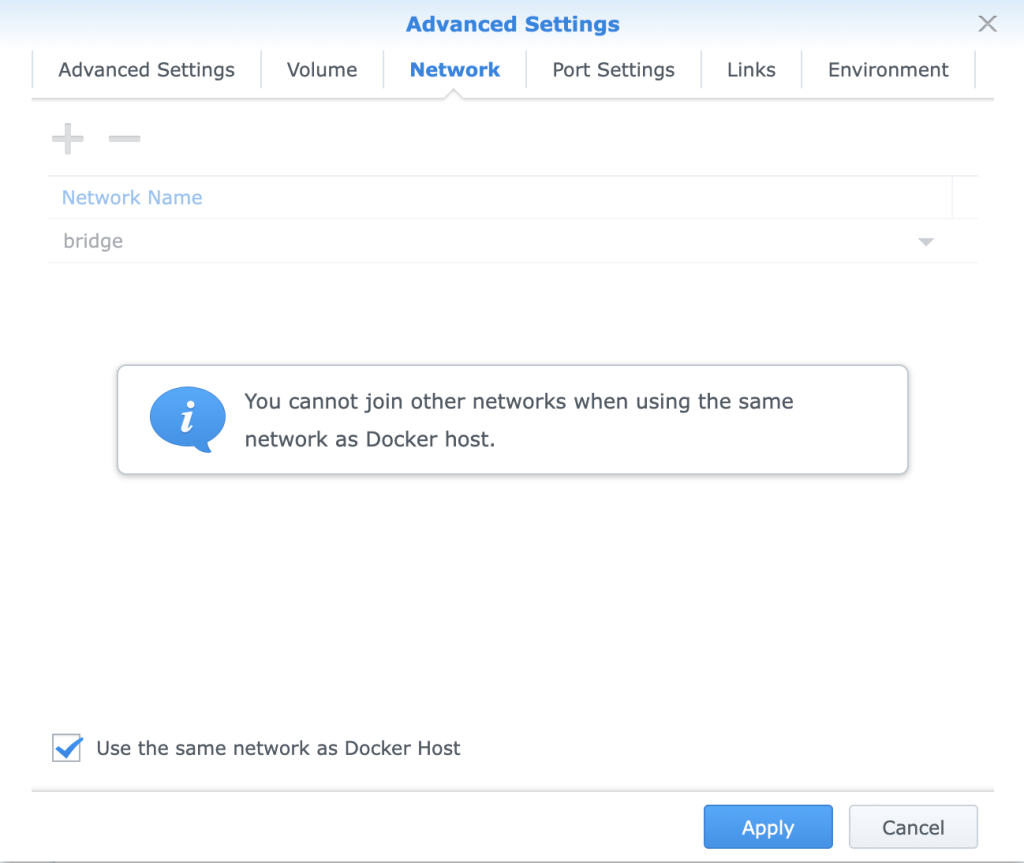
- Click on Network tab
- Mark “Use the same network as Docker Host” This way we can reach the Unifi Controller on the same IP Address as our Synology NAS.
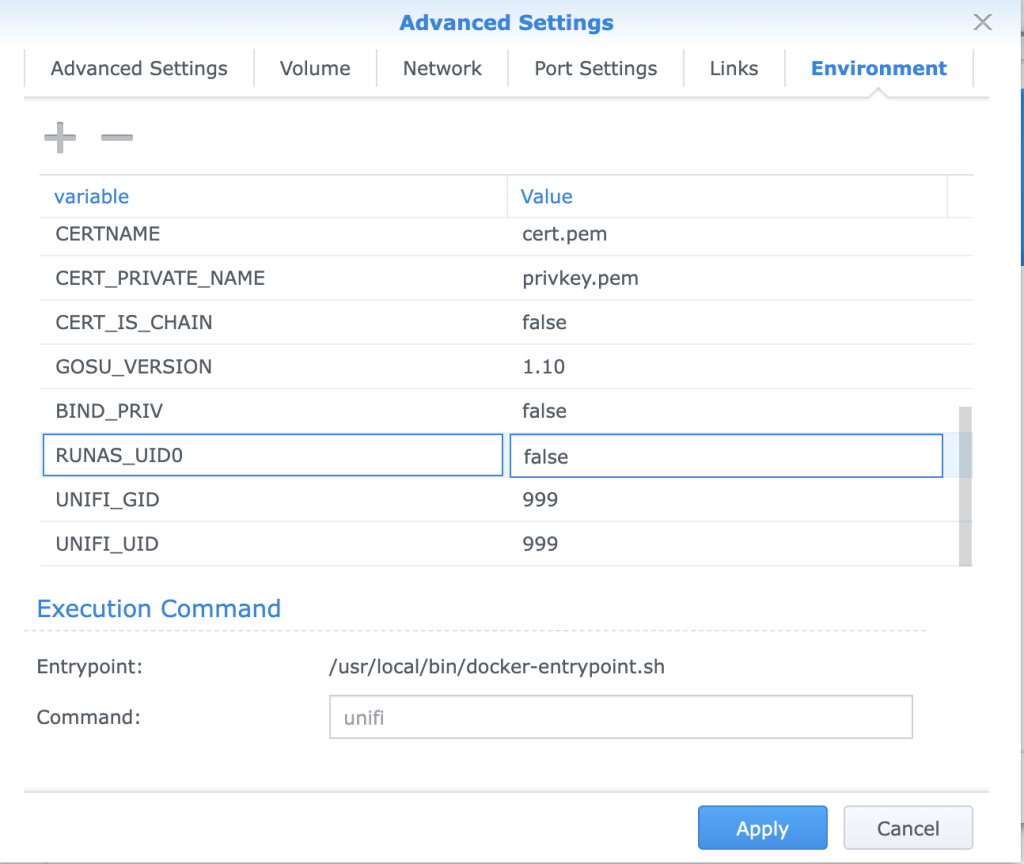
- Click on Environment tab
- Change BIND_PRIV and RUNAS_UID0 to “false”
- Click Apply
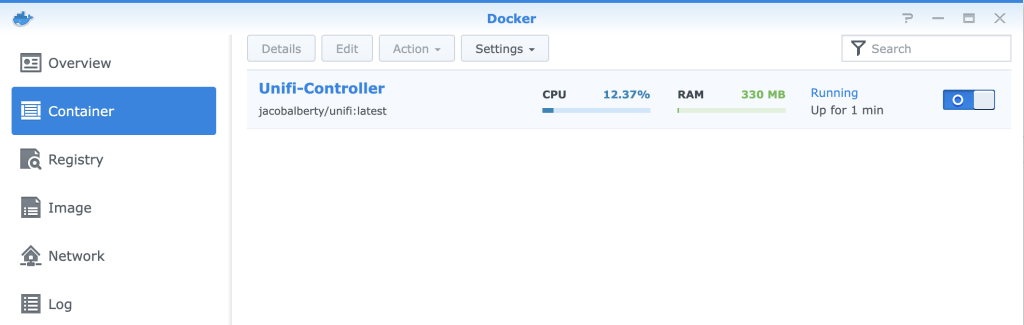
The Unifi Controller will now start and is accessible on your Synology address on port 8443. So if you can open your NAS on https://yourhostname then you can find the Unifi Controller on https://yourhostname:8443.
Under Docker Container you can see the controller is running if not you can switch it on manual.
Let’s Encrypt certificate for Unifi Controller
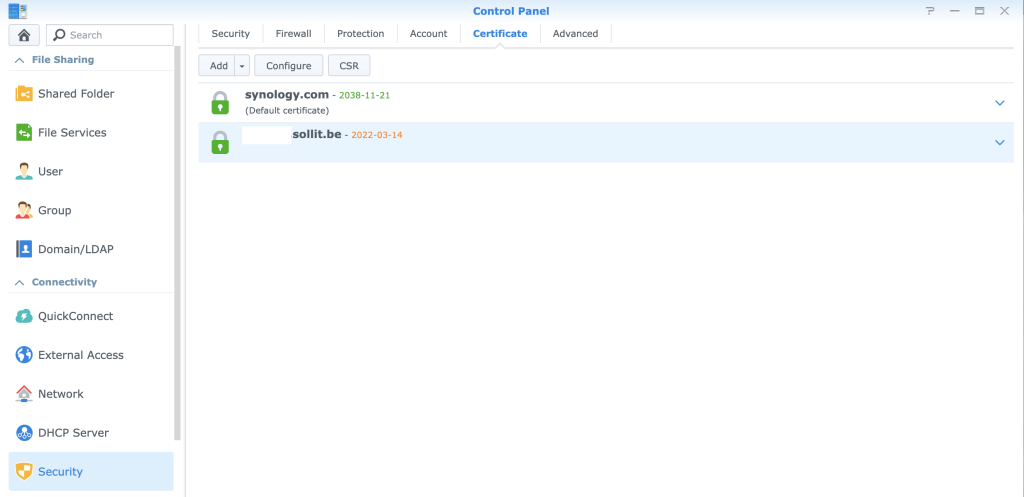
Assuming you already have a Let’s Encrypt certificate for your Synology running, we also want to use that certificate inside the Unifi Controller software.
If you don’t have a Let’s Encrypt certificate set-up yet you can so it by going to Control Panel > Security > Certificate > Add
- Add a new certificate
- Get a certificate from Let’s Encrypt and click next
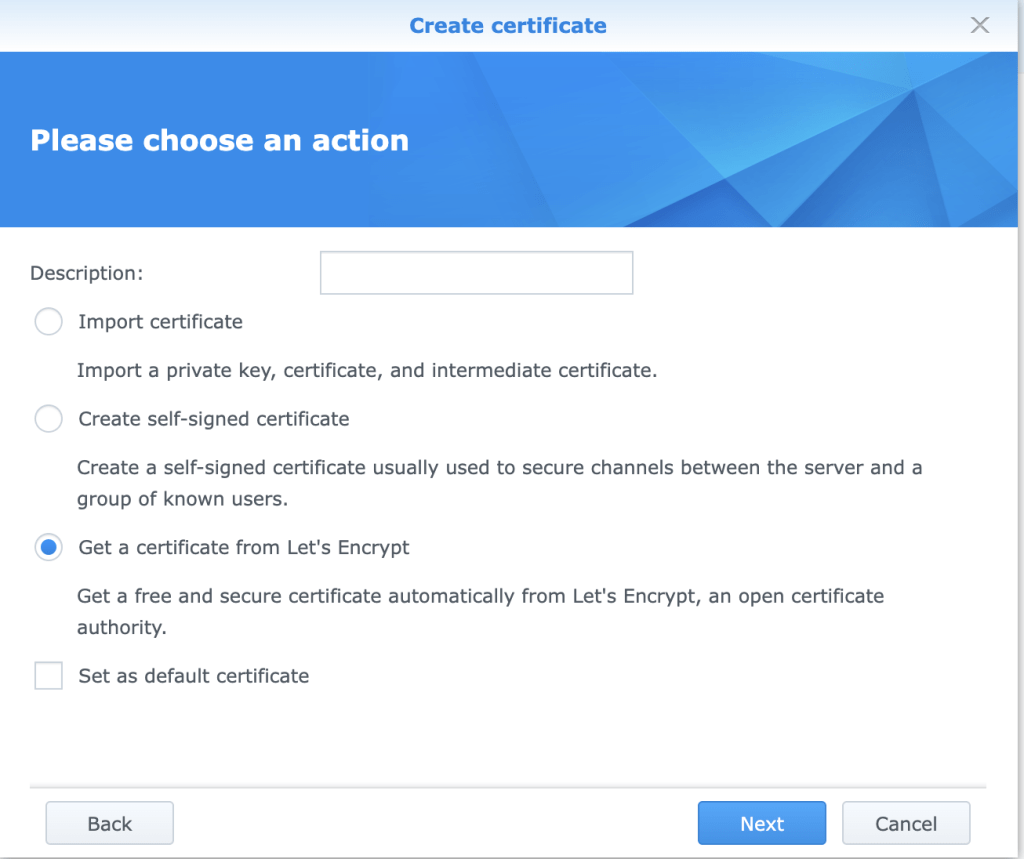
- Fill i all the details requested and press Apply
Converting the certificate and replace the current self-signed
We need to use some cli here to make it easy later on. Open an SSH session to your Synology. ssh username:synologyip
Make yourself root: sudo su
Backup the current self-signed certificate from Unifi:
cd /volume1/docker/unifi-controller/data/
cp keystore keystore.bak
Now let’s find our Let’s Encrypt certificate
cd /usr/syno/etc/certificate/_archive/
ls
It will show you some folder like this: B9ho1T DEFAULT INFO kCtrkf
Locate the folder with the Let’s Encrypt by doing an ls on the folder, the one that has the renew.json will be your Let’s Encrypt folder.
Let’s now build a simple script to make the certificate and also renew it for Unify. You can place the script anywhere you like. I placed it in the root of the /volume1/docker. Make sure you point to the correct folder in the script on line4!
vi unifissl.sh
#!/bin/bash
# Let's encrypt
echo "** Configuring new Let's Encrypt certs"
cd /usr/syno/etc/certificate/_archive/kCtrkf

openssl pkcs12 -export -inkey privkey.pem -in fullchain.pem -out fullchain.p12 -name unifi -password pass:unifi

keytool -importkeystore -deststorepass aircontrolenterprise -destkeypass aircontrolenterprise -destkeystore /volume1/docker/unifi-controller/data/keystore -srckeystore fullchain.p12 -srcstoretype PKCS12 -srcstorepass unifi -alias unifi -noprompt

rm -f fullchain.p12

echo "** Restarting container"
docker restart Unifi-Controller
Make it executable: chmod +x unifissl.sh
Run it to test: bash unifissl.sh
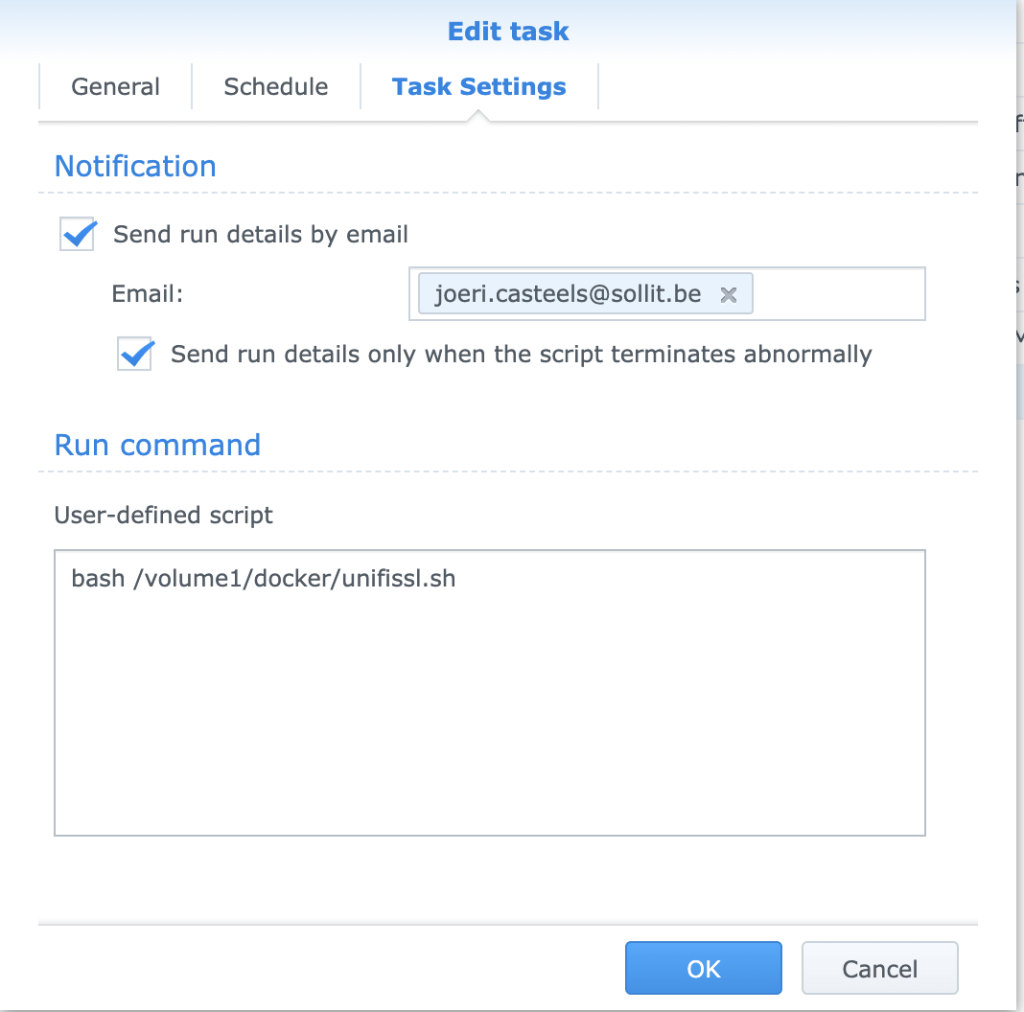
Automate it in Synology
You can make custom script run automaticly inside you Synology
Control Panel > Task Sheduler > Create > Sheduled task > User-defined script
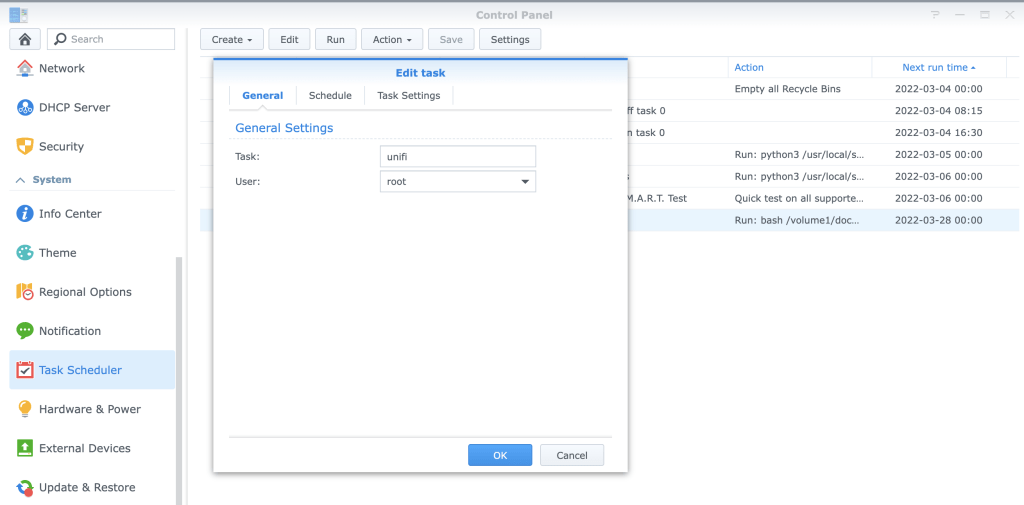
- Name your task and run as root
- Select the date when your Let’s Encrypt renews or the day after and Repeat every 3 months
- Point your Run Command to the correct path where the script is located.
Browse to your Unifi Controller on https://yourhostname:8443 it will now have a valid certificate. Enjoy!
Updating the Unifi Controller Container
Updating the Unifi Controller on the Synology is a little bit different. You can’t just download the latest version and run the installer inside the Docker container. There is no auto-update feature either, so when a new version comes out, you will need to download a new version of the Docker Unifi Image.
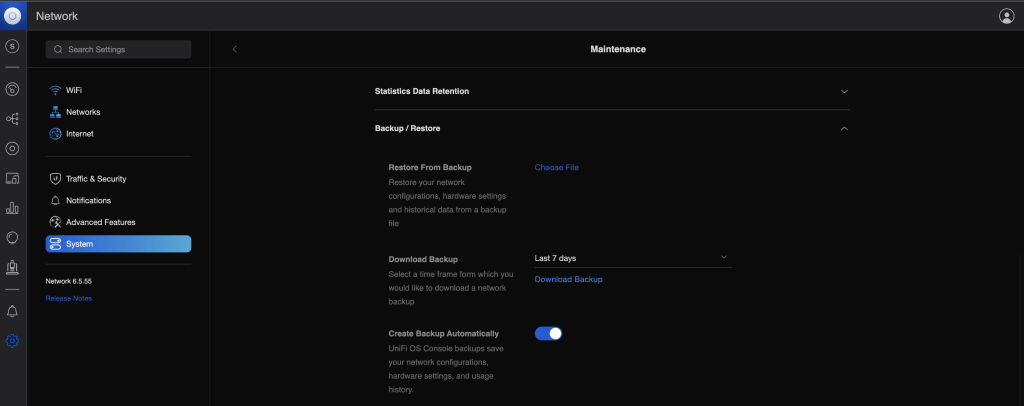
Before you start with updating you should always make and download a backup of your Unifi Controller. Login to the controller an select Settings > System > Maintenance > Backup/Restore and click Download Backup.
Downloading the latest version
To update the controller you need to follow these steps:
- Open Docker on the Synology
- Click on Registry and search again for unifi
- Select the jacobalbert/unifi and click download.
- Wait until the download is completed (check the image tab or wait for the notification)
Updating the container
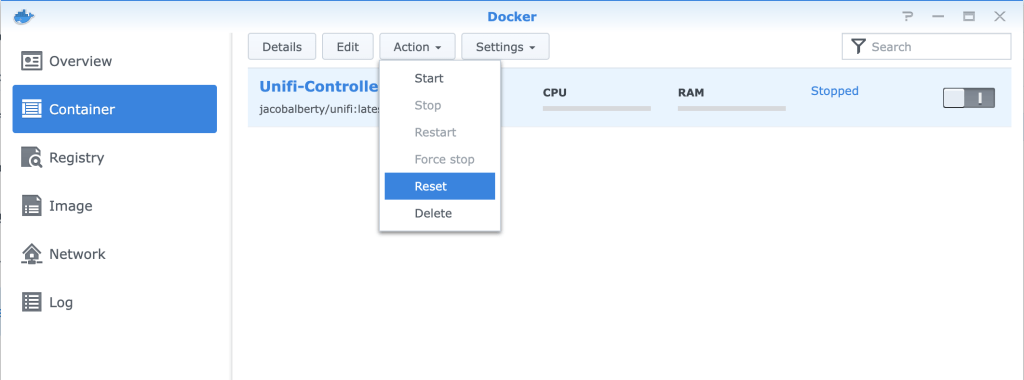
When the download is finished we can start with updating or actually replacing, the Docker image. In Docker select Container:
- Stop the Unifi Controller container by flipping the on-off switch. Wait until the status is changed to stop
- Select the Unifi Controller container again
- Click on Action and select Reset
- Acknowledge that all the data in the container will be lost. (Settings and data are saved in the mapped folder)
- Start the container again by filliping the on-off switch
You can now log in again on your Unifi Controller.
I really like your blog, but there seems to be some kind of typo in the script: it ends with a dollarsign and misses -noprompt. I have the script running, but the unify controller does not use the cert. Any suggestions?
There was an error in the script this is fixed now on the blog post
Hi Joerie
First off thanks for creating the guide. It helps me a lot with manual effort trying to add the certificate after a renewal and one of the few really working.
I believe there is a small type on the chmod command where space is missing for the argument
Also it is important to restart the NAS for the variables to updated after installing java otherwise the keytool command will not be found. Maybe good to add this.
I seem to have some issues with the keytool expression where it only works if I remove -srcstore$. This seems to be an unknown argument so not sure what it is supposed to do.
When I run it without srcstore$ it works however:
– I need to enter a source keystore password ‘unifi’ when importing
– When it renews you need to confirm to overwrite the previous keystore so I guess there are two lines missing to remove the existing keystore before renewing
cd /volume1/docker/unifi/data/
rm keystore
Any thoughts on how I can avoid the request for password so I can fully automate this with a scheduled task
Thanks
CDG
I adjusted your suggestions, thanks for your contribution. There was an error in the script this is fixed now on the blog post.
Hello and thank you for the guide.
I tried to follow all the steps but at the time of the test I get this:
ash-4.3# bash unifissl.sh
** Configuring new Let’s Encrypt certs
unifissl.sh: line 8: keytool: command not found
** Restarting container
Unifi-Controller
A reboot of the NAS fixed the previous error.
Now the keytool command is found but the script ends with the following error:
ash-4.3# bash unifissl.sh
** Configuring new Let’s Encrypt certs
Illegal option: -srcstore$
keytool -importkeystore [OPTION]…
Imports one or all entries from another keystore
Options:
-srckeystore source keystore name
-destkeystore destination keystore name
-srcstoretype source keystore type
-deststoretype destination keystore type
-srcstorepass source keystore password
-deststorepass destination keystore password
-srcprotected source keystore password protected
-srcprovidername source keystore provider name
-destprovidername destination keystore provider name
-srcalias source alias
-destalias destination alias
-srckeypass source key password
-destkeypass destination key password
-noprompt do not prompt
-providerclass provider class name
-providerarg provider argument
-providerpath provider classpath
-v verbose output
Use “keytool -help” for all available commands
** Restarting container
Unifi-Controller
There was an error in the script this is fixed now on the blog post.
Amazing script, I have a problem that when I run it I get the following error message:
Warning:
The JKS keystore uses a proprietary format. It is recommended to migrate to PKCS12 which is an industry standard format using “keytool -importkeystore -srckeystore /volume1/docker/unifi/data/keystore -destkeystore /volume1/docker/unifi/data/keystore -deststoretype pkcs12”.
** Restarting container
Just upgraded to the latest version (UniFi 6.0.23 build atag_6.0.23_14253) and i noticed that the keystore was moved up a directory to the $HOME of the controller from $HOME/data.
A simple change in the script is required to reflect this.
Hi there,
Thanks for this, finally a write up that is easy to follow and works!!! Thank you!
Only problem is, I have done all this but when I go to https://mysubdomain.fqdn.com:8443 it redirects me to a Not-Secure site.
Could you please let me know what I need to do to get this to show up on a secure site?
Woot! Woot!!
Worked like a charm, on my first try!
Thank you!!
Thank you a lot for putting this out there!
One question though. Everything seems to be working (I think), except for one small thing. After running the script and I check the certificate under Control panel -> Security -> Certificate the date hasn’t changed.
Is there a new way to verify that the things work as expected using the command line?
I did try to run `keytool -v -list -keystore keystore -alias unifi` on the keystore file to check the content, but that results in some java error saying that the file has been tampered with or password is incorrect.
You can always try to regenerate your keystore and start over? It’s possible the file is corrupt?
You try to verify this in Synology DSM? When you browse to your unifi controller you can click on the lock next to your address click on the certificate (valid) and verify the certificate expire date?
i get an error when exporting the cert
root@Nas:/usr/syno/etc/certificate/_archive/FuR4Fg# openssl pkcs12 -export -inkey privkey.pem -in fullchain.pem -out fullchain.p12 -name unifi -password pass:unifi
unable to load certificates
The problem is probably that you have something wrong in your certificate file like the header?
To show the content of a certificate request use
openssl req -in cert.pem -text
To show the content of a certificate use
openssl x509 -in cert.pem -text
Hi, DSM 7 No longer supports the Java 8 app, I have alternatively installed Java-Installer from Filebot. When I get to the ‘bash unifissl.sh’ stI come across the error ‘unifissl.sh: keytool: command not found’. Any ideas how I could go about resolving this? Thanks.
Hi, In regards to my previous message I was able to resolve the issue myself.I found that Java-Installer was installed in the folder ‘/volume1/@appstore/java-installer’. I had issues linking to the @appstore folder and used the function ‘ln -s /volume1/@appstore/java-installer /volume1/java-installer’ to create a softlink. After that I updated the file ‘/etc/profile’ with the included PATH ‘:/volume1/java-installer/bin’. Running the ‘unifissl.sh’ script resulted in no error.
Thank you for a great guide. I have had succes when running it manually through the PuTTY terminal.
I needed to make the changes to the Java PATH that user ‘Trent’ explained above. The script works when running manually, but not when running it automatically in Synology DSM. Here I get the following error:
/volume1/docker/unifissl.sh: line 8: keytool: command not found
I am running the script as Root user.
Any help is much appreciated.